Museums & Installations
Asking players to connect to a local network and then type in URL like
happyfuntimes.net works just fine but HappyFunTimes supports an even
simpiler style for things like museums, events, and art installations.
In this mode players connect to a dedicated router for the game. On iOS
The moment they connect to to the WiFi they are instantly directed to the
game, nothing to type. On Android they can type any url, for example,
h.com and they'll get connected to the game.
No internet connection is needed in this mode.
Networking Basics
A quick note on IP addresses. First, in your router's manual it will most likely
tell you to set it up, open a browser and go to http://192.168.0.1 or http://192.168.1.1
For my TP-Link TL-WR702N it has me go to http://192.168.2.254.
The 192.168.2 part, the first 3 numbers, are the address for your local
network. Your local network is the network created by your router that all your
computers and phones connect to. The 254 or the last number is the number
assigned to a specific machine. In this case the router is assigning itself
the number 254 in the 192.168.2 network.
What we need to do to get installation mode to work is
- Figure out what our network number is (the first 3 numbers of the router)
- Configure the router to assign a specific number to the computer running HappyFunTimes
- Tell the router use the HappyFunTimes computer for DNS
For part #1 we probably already know the number because the manual for router said
to type it into the browser to access the settings page. If not check the settings.
For example on the TP-Link WR702N it's under Basic Settings->Network->LAN.
For #2 see below. Basically we need to tell the router for a given computer's mac address assign us a specific number on our local network. If we didn't do this we'd get a different number everytime we connected. A mac address is a unique number for your computer's networking equipment. Depending on the computer there are different ways to look it up (see below).
For #3 we tell the router the number we assigned in #2.
DNS is the way computers translate a name like "google.com" to a number like 172.194.117.133
(which is Google's computer's address). By telling the router to look to the happyfuntimes machine
for converting names to numbers (DNS) happyfuntimes can redirect the phone
to your installation.
Looking Up Your MAC Address
MAC address does not stand for machintosh. It stands for Media Access Control Address.
To look it up on Windows open a command prompt and type getmac
To look it up on OSX open the network settings in the system preferences
NOTE!!!: Your computer has a different MAC address for WiFi vs Wired networking. The MAC address you need to look up is the MAC address for the way you'll connect the happyfuntimes machine to the router!
If you can connect the happyfuntimes computer to the router with an ethernet cable that should be your first choice because you don't have to worry about WiFi interference.
If you're connecting the happyfuntimes comptuer to the router via WiFi then you need to look up your computer's WiFi MAC address.
Be sure to look up the correct MAC address
Setup for most routers
First, get a router. You probably have an old one sitting around or if you want to be portable I recommend the TP-Link TL-WR702N though it will only handle 13-14 players and it's under $20.
Find the IP address of your router. If the URL in your browser looks something like http://192.168.2.254/???
then that's the IP address of your router. Otherwise check the lan settings. For example

Now that we know the router's IP address is 192.168.2.254 we know our network's address
is 192.168.2 (see above). If yours is different remember that for all the ip addresses below
you need to change the first 3 numbers to match your network address. For example if your network is 192.168.0
then all the ip addresses below need to start with 192.168.0. If your network is 10.0.1 then all
the ip address below need to start with 10.0.1.
Go to your router's admin page and find the DHCP settings. Somewhere there should be a place that lets you assign a specfiic IP address to a specific MAC address. On TL-WR702N that's under Advanced Settings->DHCP->Address Reservations
I looked up the MAC address for my machine (the machine running HappyFunTimes) and assigned it
directly to 192.168.2.9.

I then went to the DHCP settings at Advanced Settings->DHCP->DHCP Settings and
configured it to give out IP addresses from to 192.168.2.10 to 192.168.2.250.
Finally I set the DNS there to the same address I used for the HappyFunTimes machine.
(192.168.2.9)

With that done I picked a nice name for my WiFi's SSID under Basic Settings->Wireless->Wireless Settings

and in my case I decided to turn off security so no password is needed.

This may or may not be a good idea since lots of people's devices are set to automatically connect to open routers. If you're in a relatively isolated location and everyone is going to play it's probably good. If you're in a more public location you probably want to add a password just so people not playing don't get accidentally connected.
With that done, reboot the router, connect your machine. Now follow the instructions below
Using your router for normal internet access
Once you've made these changes on your router the only things you should need to to use it as a normal router again are
Clear the DNS address in your DHCP settings
You set the DNS address to point to the machine being the relayserver. Either clear that setting or set it to a real DNS server like Google's Public DNS servers
8.8.8.8and8.8.4.4Turn security back on
If you made your WiFi open/unsecured you probably want to turn that back on
Starting HappyFunTimes in installation mode
Depending on the version
If you're using the Unity version of HappyFunTimes
There are 2 ways to run installation mode.
From the Editor
Pick Window->HappyFunTimes->Settings in Unity
Check "Installation Mode"

Run the game
From an exported game
Start the game from the command line and add the option
--hft-installation-modeOn OSX
nameofgame.app/Contents/MacOS/nameofgame --hft-installation-modeOn Windows
nameofgame.exe --hft-installation-mode
If you're using the electron verison of HappyFunTimes
Open a node command prompt or terminal and on OSX type
sudo npm run start -- --dns
On Windows just
npm run start -- --dns
You need sudo on OSX because port 80 is normally restricted to admin users only.
After starting in installation mode
Try connecting a smartphone to your router. If it's an iOS device it should
automatcally come up with a page that says "Start". If it's an Android device
open the browser and go to hft.com or any http:// url.
Troubleshooting
If installation mode is not working for you it's possible your router can't handle it BUT here's a few steps to check
After you've setup installation mode on your router:
Windows
open a command prompt and type ipconfig
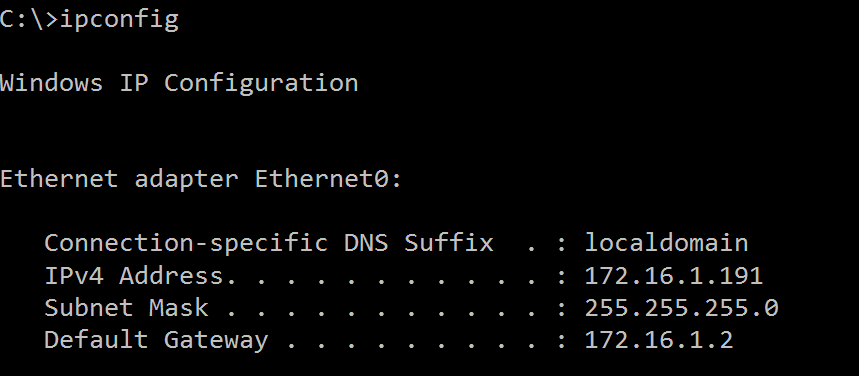
The IPv4 address should match the one you specified in your router configuration when assigning a static IP address for your computer
Then if you run the game in installation mode and then alt-tab back to the command prompt and type nslookup foo.com
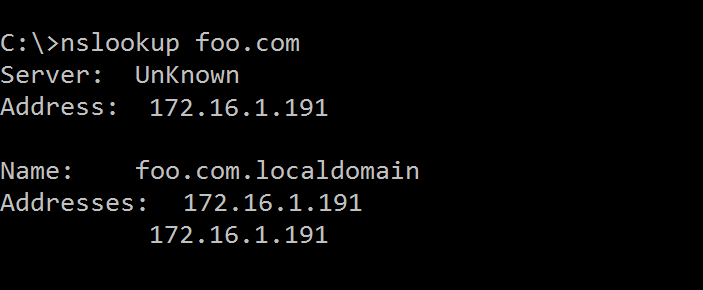
The 1st and 2nd with the 3rd maybe being your Default Gateway from above numbers should match your IPv4 address from ipconfig
If those don't match then your router is not setup correctly or else you've maybe you manually put DNS addresses in your computer's network configuration and need to remove them.
macOS / Linux
open a terminal and type ifconfig
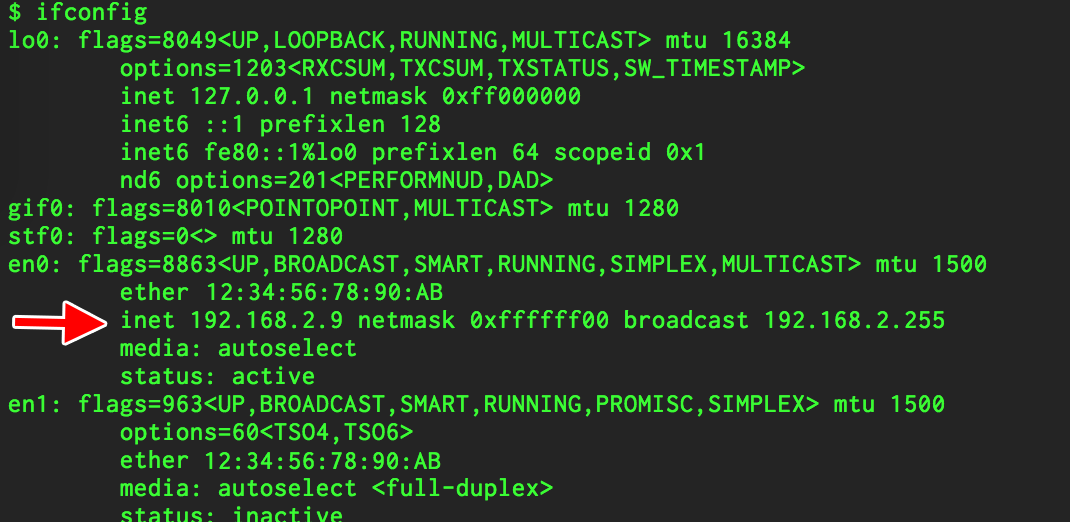
The IPv4 address should match the one you specified in your router configuration when assigning a static IP address for your computer
Then if you run the game in installation mode and then alt-tab/cmd-tab back to the terminal and type dig foo.com
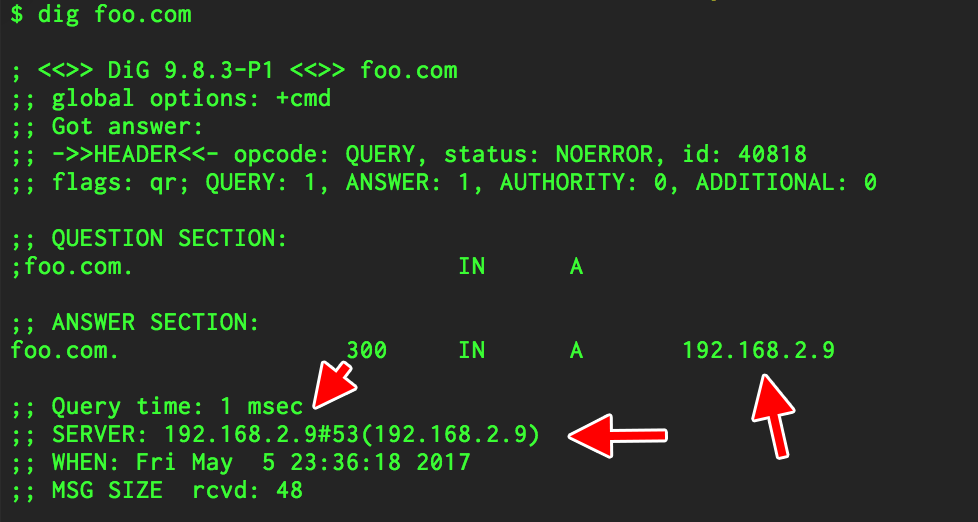
The 1st and 2nd with the 3rd maybe being your Default Gateway from above numbers should match your IPv4 address from ipconfig
If those don't match then your router is not setup correctly or else you've maybe you manually put DNS addresses in your computer's network configuration and need to remove them.
Setting Up an Airport Extreme
Unlike every other router in existence the Airport Extreme requires custom software to configure it. If you're on Windows or Linux you'll need to download it here.
Connect it by ethernet cable to your computer. Use one of the top 3 sockets on the airport extreme to connect (not to be confused with the bottom socket which is for incoming internet).
Start the Airport Utility on your computer and select the airport extreme from the image then select edit.
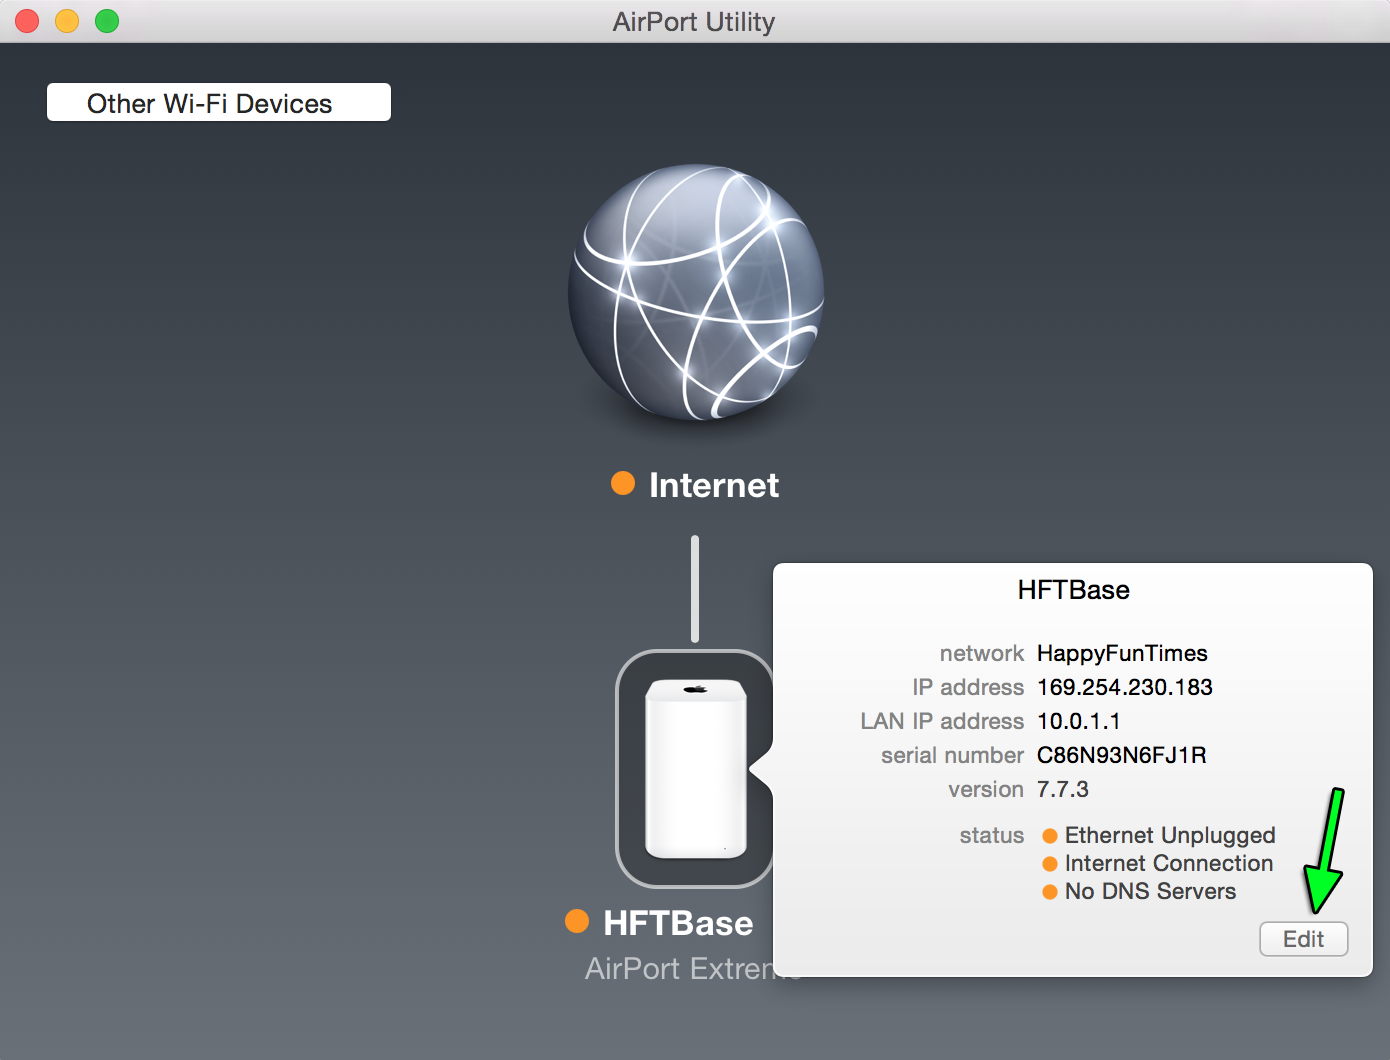
Under the Network section click the + button to add your machine
to the DHCP reservation list.
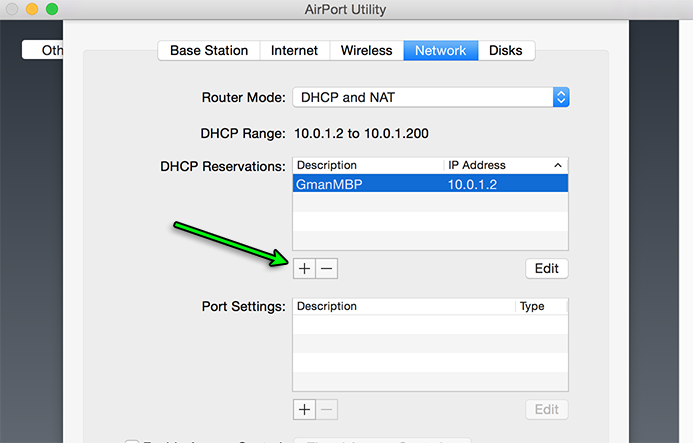
Then add your machine. You'll need to know your machine's mac address.
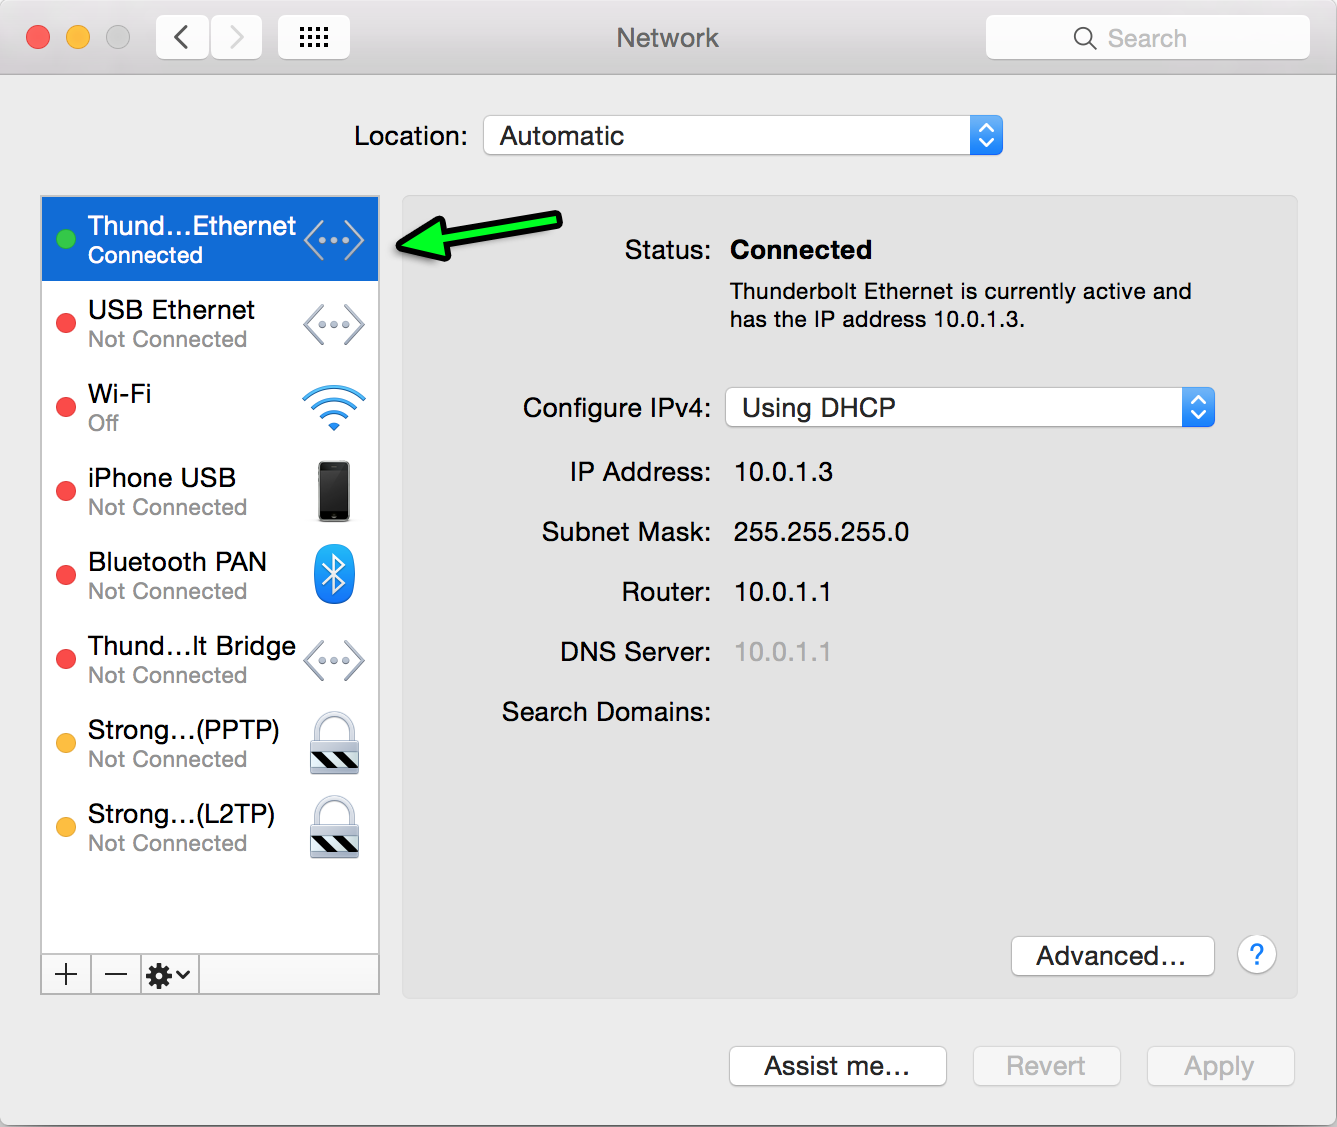
On Mac you can look that up in the the menus by picking
Apple Menu->System Preferences then clicking on Network.
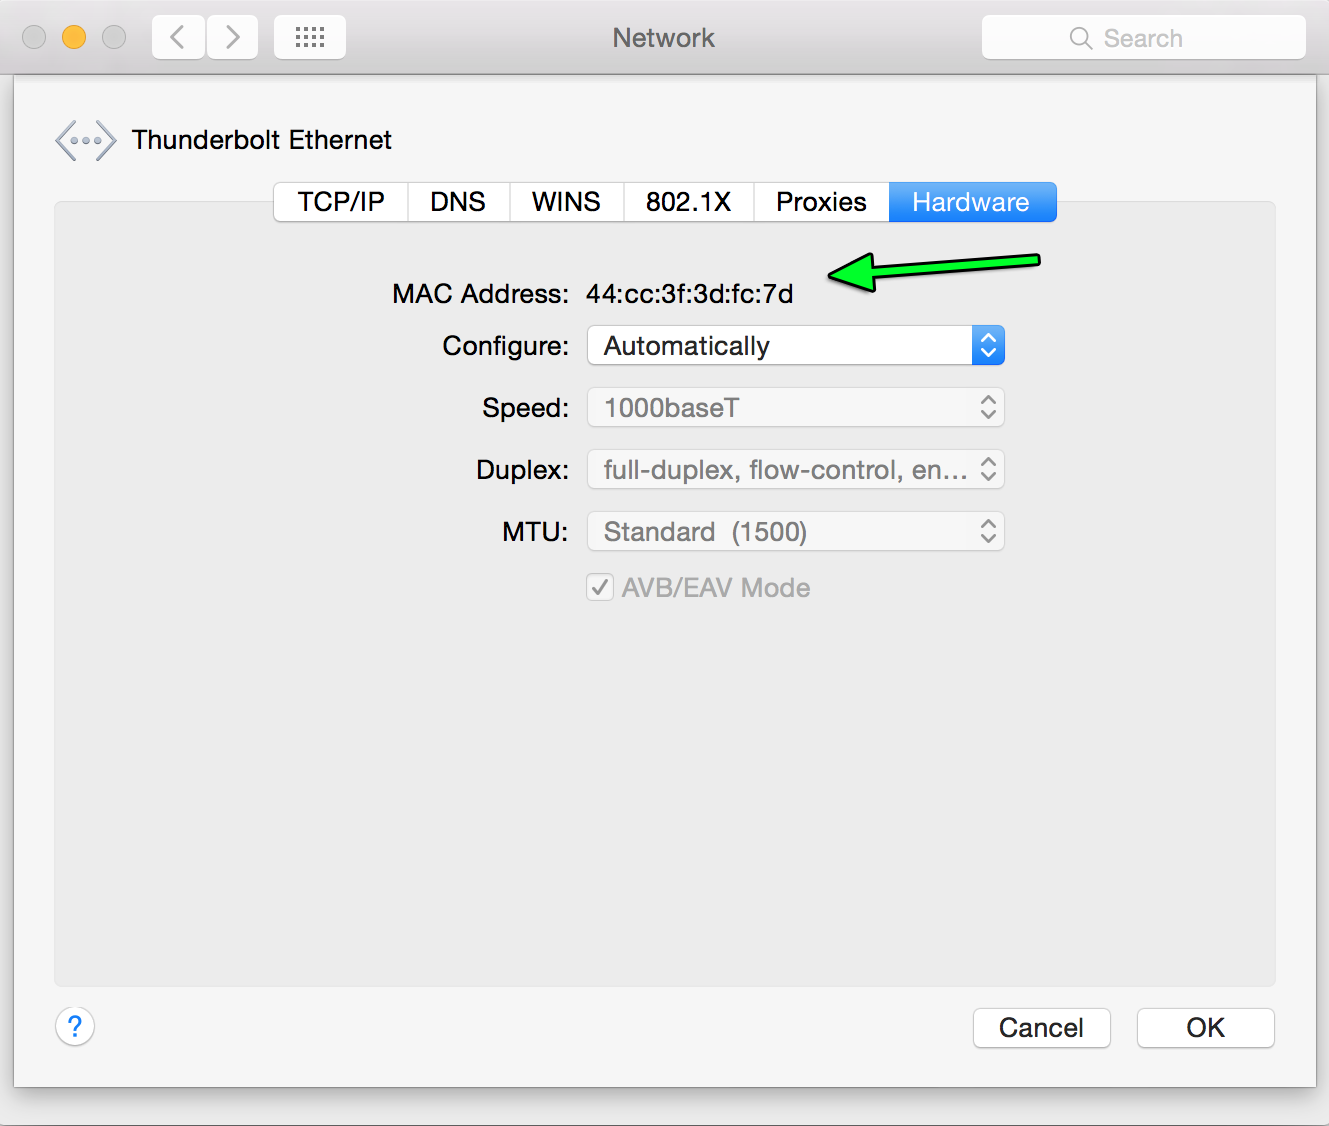
Select the Thunderbolt connection
and then clicking the hardware section
On Windows you can look up your Mac address by opening a command prompt
and typing getmac. You want the mac address for wired/ethernet networking.
Type that number into the aiport extreme settings for "MAC address" (yes the numbers in these picutres don't match. For you they should match). In description put whatever you want to remember that's your machine. Select "Mac Address" for "Reserve Address By".
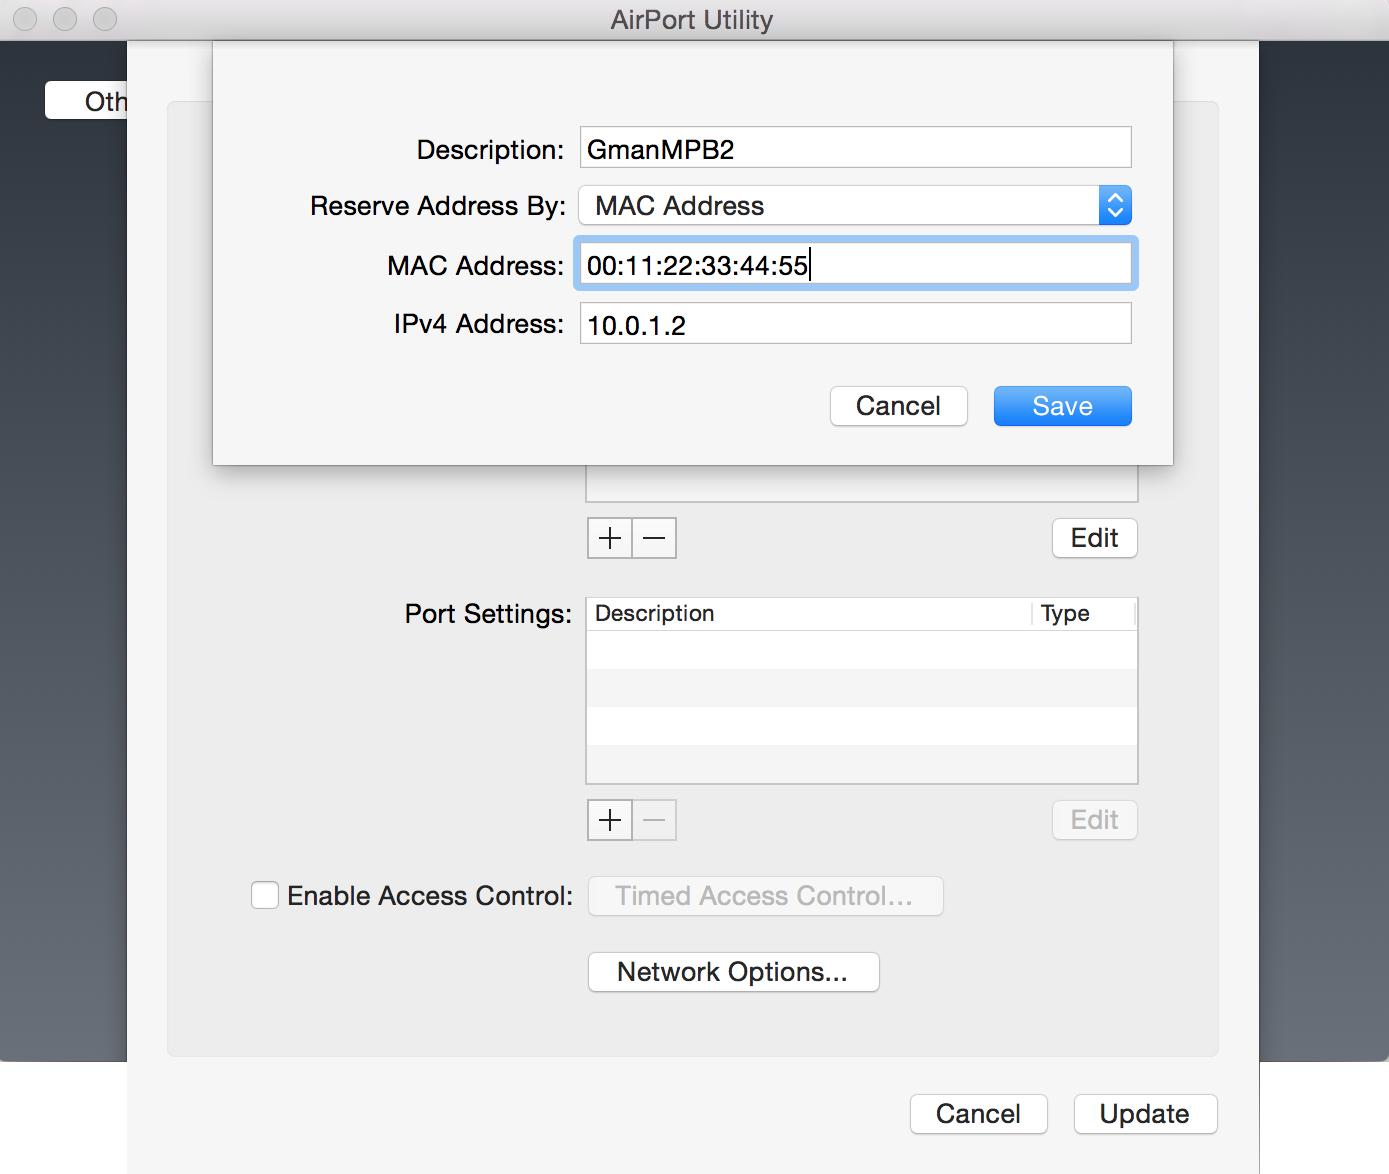
Note the number under IPv4 Address. It probably defaults to the correct number for your setup. Note the number.
In the Internet section of the Airport Utility put that number in the 2 spaces for DNS Servers
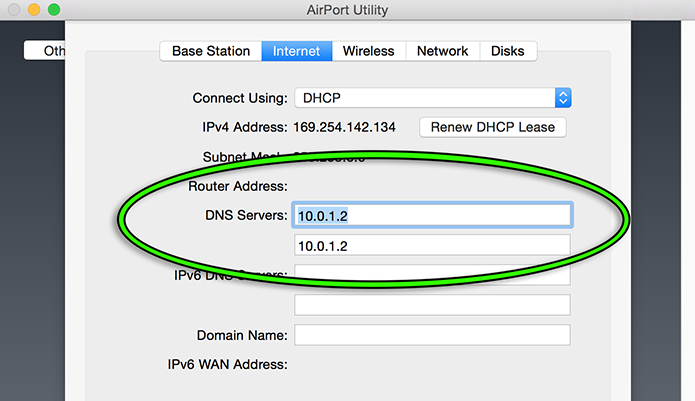
Note: with these numbers set in DNS server your Airport Extreme will no longer work for internet access. You can only use it for HappyFunTimes installation mode. To use it for internet run the Airport Utility again and clear those 2 numbers.
After that you may want to setup the WiFi security. I would suggest adding a simple password because otherwise people's phones walking by your installation will connect to it even if they don't plan on interacting with it.
Finally click "update" at the bottom to update your Airport Extreme.
Now follow the instructions above
Maximum Number of Players
Apparently the TP-Link TL-WR702N only supports around 15 wireless devices at a time which means the main computer running the game and 14 players.
Netgear claims their dual band routers can support 64 devices. Unfortunatly netgear routers don't allow you to change the DNS server their DHCP server reports so avoid them. They always report themsevles and/or they always look on the WAN for resolution instead of the LAN. You can install a different firmware like DD-WRT if you're adventurous but otherwise choose something else.
Apple claims 50 devices with the Airport Extreme though it's ambigous if that means 50 wifi devices or something else. I got one and so far it's been pretty great. One time I had 92 people playing Bombbomb. I'm not sure if that was a bug or real since the specs say 50 people. Maybe it's 50 for 5ghz and 50 for 2.5ghz?
Buffalo claims between 10 and 50 depending on the device.
This is all pretty frustrating. It would be nice to know the least expensive way to allow lots of players. If you're a network guru please contact me or submit a pull request with updates on what's best. Especially given the specfic needs of HappyFunTimes. We're not streaming video or dowloading torrents so for example, rather than buying the top end routers consumer routers maybe it's better to by 2 to 4 cheap home routers and set all but one of them into AP mode (Access Point)? Or should we go to business routers? Unfortunately at this time I have no idea.
If you try this setup with a different router please post your results. Add to this doc or file an issue or something so that others can learn how to configure their routers.